I have had lots of issues with framing large drawings. Once you get over about 4 or 5 foot lengths there are all sorts of problems, not least the weight if you try and frame under glass. I have finally come to the conclusion that clear perspex will have to do, simply because the glass just gets too heavy for me to manoeuvre. I realise museums and large galleries prefer glass as its much clearer, sharper, doesn't scratch and is easier to clean but sometimes you have to make a compromise.
An other issue is warping. Wood bends, no matter how well you make a frame and therefore perspex sheet can easily slip out of the top lip of the frame which is a very narrow holding area and it will need to be held in place firmly. This together with the need to use materials to hold the drawing in place that won't eventually damage the paper surface has led me to come up with the following solution.
Above is a basic cross section of the frame elements I'm using. The side frame is a pretty robust 3 x 1inch section, with a rebate to form a lip, the whole frame sprayed white, (I like white as it sits easily with the paper, I personally find black or coloured frames too distracting).
End section of the outside frame, before cutting with a circular saw at 45 degrees
Saw set at 45 degrees
I'm using 4mm clear perspex instead of glass, but you could use 3mm, the 1/4 by 1inch wooden strip is also sprayed white and I'm using 4mm white PVC foam sheet to fix the drawings to, simply because this is the only material I could find that comes in large enough sheets. The backing frames are made of 3/4 x 1/2inch section, this because its robust enough to screw firmly into the outside frame, but light enough to not add unduly to the overall weight. (I tend to think in inches and feet, but metric sizes are needed to order materials, so they are included in the list of suppliers and materials at the end of this post).

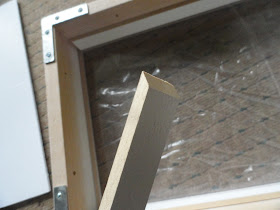
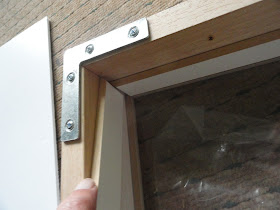
I first of all had a small model made so that all the elements could be checked through and when working with somebody else, there is a clear set of elements to work to and you can practice before handling large delicate drawings. You can't frame very large drawings on your own, so at some point you will have to communicate what you need doing. You can see in the model above, that the perspex is already in place, (notice the plastic covering is still on the outside, this is to keep the outside as free from scratches as possible) and the 1/4 by 1in white painted strips are being put in place. The strips are cut at 450 for the corners and are used to both hold the perspex in place and keep the backing PVC sheet away from the front of the perspex, thus allowing the drawing to sit well behind the surface.

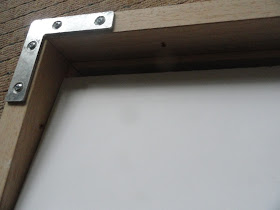
The side strips push down snug if you have measured the inside dimensions accurately. On the full sized frames I use wood glue to stick the corners together. The metal L bracket is used to give extra robust support to the corners, something that is not always needed, but can be essential with frame sides over 6 feet in length.
Once the sides are in place, the PVC sheet goes in, (you can't see the drawing as it is attached on the perspex side, and I'll go into detail how to attach the drawing later).
Finally the 1/2 by 3/4 frame is put in place.
Notice that the sides of the inside framework have holes for screwing into the sides of the large surrounding frame, this will make sure any outside frame bowing is eliminated and the perspex and PVC sheet are held firmly in place.
This is how the back of a frame looks when assembled, as you can see this frame is tall and narrow, so only has inner frame struts running one way crossways, but in wider frames the struts need to go both ways and form a grid.
When putting in 1/4 by 1inch white side strips in a large frame you will need to use strong double sided tape to hold the long edges in place, as well as gluing the corners. Short sections of tape are stuck to the sides, as above, just before putting the sections in place. I use the cardboard packing that the perspex comes in to protect the whole job while working. See below.
The drawing has been attached to the PVC sheet and is ready to go down. The perspex is in place, but no side lengths put in yet. However you can see from this image how much of the perspex covering is left on the outside, nearly all of it, just a little removed round the edges so that the covering doesn't get trapped in the edges of the frame.
Holding the drawing in place is a bit tricky, because on the one hand you need strength as a large sheet of paper is very heavy, but on the other hand you need to ensure that your fixings are sensitive to the paper used. In every case things will be slightly different, but in this case the paper is approx 300gsm and about 6 feet long. The tape that is attached to the paper has to be acid free and archival quality, in this case linen gum tape.
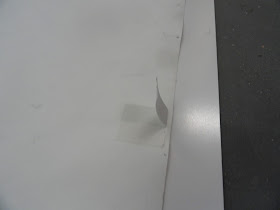
You can just about see the tape's linen texture here, the gum is on the other side and you simply damp it slightly with a sponge. Be careful to just dampen, not wet, as this can lead to water damage on your paper. Attach half of the tape to the back of the drawing paper, then fold over to create a sort of L shape, the fold is near to the edge of the paper, but not right on the edge, just far enough in to hide it. Then let the tape dry. If you try and move on at this point the tape will slide off, it takes a good hour to firmly dry and stick tight.
These tabs allow a strong adhesive tape that will stick firmly to the PVC to be attached to the non stuck down side of the hinge. This means that you have no problem with any future yellowing due to the acidic content of the tape. The problem is simply that the types of archival tapes made for papers are not strong enough to stick to the smooth PVC surface.
I use Arqadia tapes and have photographed them so that if you needed to quote reference numbers they are easy to see. The one above is especially sticky and bonds well with the PVC sheets.
The image above shows the sticky adhesive tape stuck crossways across the gummed linen tape, the drawing is then ready to be put down onto the PVC sheet. Don't try and do this on your own, I work with someone who is a specialist framer and he has a 'good eye', which is essential for this part of the job, as you need to centre the image properly before firming down the sticky adhesive tape to the PVC.
Putting the PVC sheet down really needs two people because the outside frame can bow out and your perspex sheet and PVC sheet can pop out onto the floor if you are not careful. So one person often has to push and hold the sides in to make sure everything sits properly. Then its simply a case of popping in your back frame and screwing it into place. Again though it's a two person job as someone has to make sure there is no slippage or movement, once the frame is screwed in everything should be nice and firm though.
Job done
Details of
companies and materials used.
For framing
materials:
Arqadia Ltd.
01234 852777
For the external frame
ARQ
Moulding: Product No.: 411 000
127
Width (mm): 29
Rebate Depth (mm): 67
Depth (mm): 73
Colour: White
Profile:
Flat
Finish: Stain
Wood Type: Ayous
For the
interior rebate frame.
ARQ
Moulding: Product No.: 457 000
127
Width (mm): 29
Depth (mm): 6
Colour: White
Profile:
Spacer
Finish: Stain
Wood Type: Ayous
Also for all
tapes and glues as they specialize in archival materials.
For both the acrylic and PVC
T&A Precision Plastics
01132402566
4mm clear
acrylic sheet
4mm PVC foam
sheet
For pine lengths for making the backing frame.
Kirkstall
Timber
0113 242 7955
12 X 21mm
pine ordered in 10 foot lengths
As to prices these will always be changing, but expect to spend at least £200 per frame.
For a small (in my terms) frame, approx 6 feet by 3 feet, the cost was approx. £225, without labour, and I have to pay someone to help me, and don't forget delivery costs.
However if you are doing this in college, you can get lots of help from technicians and you can order materials through the college, so that they can be delivered in with other orders.
So you may well decide that framing a large drawing in this way is not for you. That's fine and most large drawings work at their best when simply pinned to the wall, but at least you have an awareness of the implications to consider if you ever do want to frame.
If you need to frame A0, A1 or smaller there are quite a few local framers who charge good rates, (I can let you know contact numbers) however they don't usually take on jobs over A0 as they need a lot of floor space and it can't be done as a single person job.
Above all think of why you might frame, see previous post.
One of my drawings made up of 4 A1 sheets framed using the above method.
Even framers can be famous: see
When framing edges become very important, you can explore some of the issues in this post on Edges
See also:
Trapping and framing
The frame and the banner
Fixings and fittings
Hanging large drawings
More on framing
From drawing to installation


