These are a few suggested things to do which act as ice
breakers whilst you are thinking about what your subject matter will be and
what drawing processes you will use.
1. Developing
your sense of touch
Rubbings and textural mark-making
Materials
Materials for rubbings: Thin paper,
such as newsprint and photocopy paper or brass rubbing paper. Charcoal, Chinagraph pencil, soft
pencils i.e. 4B/5B, children’s wax crayons such as Crayola, blocks of brass rubbing wax.
Materials
for textural mark-making: As above plus a good varied range of artist’s
brushes, dip-in pens which are available in various nib sizes, black acrylic,
Indian ink, Quink ink, sponges both marine and synthetic, black oil pastels,
black and white chalks and pastels. What to do
Take
rubbings of various surfaces, thin papers will let you achieve delicate marks
and thicker papers may be used for very rough surfaces. Each drawing material
will leave different traces so use a variety of these too. Try using different
hand pressures and changes in rubbing technique, such as loose open gestures,
then careful controlled ones.
The
next stage is to examine textured fabrics that you can’t take rubbings from.
Try to create marks that respond to the patterns or weaves of your fabrics,
Find ways to represent the differences between each fabric or surface examined.
Try and make rubbings of various objects, some will appear clearly, such as an outline of a pair of scissors but some will be almost impossible to recognise because they are too complicated.
Try and make rubbings of various objects, some will appear clearly, such as an outline of a pair of scissors but some will be almost impossible to recognise because they are too complicated.
Reference
Look at
the work of Ingrid Calame and read what she has to say about why she draws.
Try using tracing paper laid over the rubbings to discover images or make connections between the various surfaces you have produced.
Cut up and reassemble the various rubbings, in order to make images or abstract structures.
Materials:
Use any of the materials suggested for rubbings and textual mark-making. You
might also need masking tape, black tapes and other non-traditional drawing
materials. For instance using a broken comb to make texture by scraping it
through an area of black boot polish. You might want to gesso your paper beforehand, so that you can scratch into it. Paper might be large roll size or small
units of paper that you add to.
Try to work on large sheets of paper, and make sure you have the
ability to extend these in any direction by cutting out extra rectangles and
adding them to the initial sheet of paper. Don’t try and check what your face looks like in a mirror beforehand. Before starting to actually draw, you can make a feeling test. Close your eyes and feel your head with the hand you do not use for
drawing. Starting at the back, think about how the hair gives an initial
textural set of information, then press harder to feel for the bone beneath.
One texture replaces another. Do not take your hand away in order to move it to
another area, keep it in contact with the head, moving slowly over your head’s
surface, once the back of the head is explored, the top of your head should be
investigated, then the front, then the sides, some areas being touched several
times as the hand makes its way between other sources of information. You are
encouraged to feel inside noses, mouths and ears, to think about how a pair of
glasses extends out from the surface of the head or how an earring may suddenly
change the textural world.
Then make a palette of marks, make tests and try outs using different
media whereby you are trying to make marks that approximate to touched
‘feelings’. Try scratching into the paper, especially if you have gessoed it.
Once you have made your tests, finally you can begin drawing. Try to forget what a head looks like (this is
impossible but the idea is that this drawing doesn’t need to rely on your
memory of what a head looks like), and to begin feeling again before drawing.
Again you are encouraged to start at the back of the head, remember that when
collecting ‘touch’ information, there is no back and front, just a continuous
surface and starting at the back might help you to get away from the 'look' of the head. As you start drawing you are to invent surface information as a trace
of passage. If you are feeling an ear, how does a mark change from hair, hair
over bone to the cave like entry for the finger, then how does the feeling tone
shift from open to closed surfaces? Fingers might trace their way across the
top of a head and down over the front, moving over one eye and missing another.
Alternatively a hand may be moving up from the neck, over the chin and then
move left once the mouth is met and go on towards an ear. Fingers may of course
explore the inside of the mouth and as this is just a continuous surface, the
information should continue to just spread over the paper as you draw. The implication is that your body is all one surface, and even though you can't follow the implications of touching the inside of the mouth down into the stomach, you might be able to suggest the idea that this surface has points or areas that change direction and become holes.
Questions such as the nature of up-ness and down-ness in a world without
sight could be explored. Is this drawing
now becoming more about distance positioning? One eye is perhaps ten thumb
lengths from the other if the feeling is done around the back of the head but
only a single thumb length, separated by a nose bridge the other way. How do
you know it’s the same eye that you are coming back to? If you were feeling
someone else’s head how would the information be encoded? You ‘know’ the fingers
have reached the nose if it is your own, but if you were feeling someone else’s head you might
perhaps mistake one area for another.
Once the first touching exercise is done another approach is to draw a continuous ‘felt line’; this is
done by drawing a line that stretches from the back to the front and to
the back and to the front again. Starting with perhaps the left ear, the
fingers feel over the front of the face (or back), to the right ear, around the
back to the left ear again and onwards to the right ear again. If there isn’t
enough room on the paper for the marks you can add an extension. Try and make
the texture visual, as these are not drawings that will be read by touch, they
will be looked at and the link between touch and sight will be what becomes
interesting.
Once the drawings are done, consider making relief images from them or embroidery or re make the drawings back into 3D shapes.
Once the drawings are done, consider making relief images from them or embroidery or re make the drawings back into 3D shapes.
Drawing an object/objects by touch
Get someone to place an object in a bag or box that you can put your non
drawing hand into. Don’t look to see what it is and don’t let them tell you
what it is. Then using touch alone draw the objects/objects, using everything
you have learnt from the drawing your face by touch exercise.
Your drawings should show a sensitive response to touch and contain a
range of interesting felt marks. You are making an abstract translation of how
your object feels, not a literal representation of how it looks. What is
important is the synchronised route of communication between both hands and the
transference of one sort of information (touch) into another (drawn marks).
Make two sets of drawings and then try and use one set to remake the object as best you can, finally you are allowed to look at the object.
2.
Drawing
and Memory
There is always a gap between looking
and drawing, in that gap you forget things. This gap is though of vital
importance in the development of ideas related to visual importance and
conceptual weight. Gainsborough used to test his visual memory by setting up a
still-life in his basement and putting his drawing studio in his attic. He
would spend time looking and then run upstairs and draw until he could remember
no more. He hated climbing stairs so worked hard to develop his visual memory.
Here are two ways to approach this
issue.
Without looking at the drawing and
keeping your arm extended at a comfortable full length, start to push and pull
the pencil around, trying to synchronise the lines you make with what you are
seeing.
Keep your pencil in contact with the
paper and move it continuously. (If you get tired take a rest, your shoulder
muscles will ache as the drawing progresses so do give yourself a rest). Work
slowly and keep to one continuous line. Twist and turn the pencil, sharpen it
to a chisel end, press lightly and hard. Try to produce an unpredictable,
awkwardly interesting line.
Make sure you don’t concern yourself
with the drawing. Concentrate on the looking. Draw until you can’t do it any
more; then finally look at what you have done. If you have to have a break,
don’t be tempted to look at what you did.
Check this out
Check this out
Part 2
Repeat what you did for the first
drawing, this time using your drawing hand. You will need to reposition your
drawing board on the other side of your body, so that you can’t see the
drawing, as before only what you are drawing.
This way of drawing helps you get the
idea of drawing as a discovery, as a process that allows new things to happen
and it facilitates awareness. What you can hopefully do is develop a much better synchronised communication between the eyes and the hands.
Starting to look, but only occasionally
Set up as before, however this time if
you are using an easel and drawing with your right hand, you may find it better
to look to the left side of your board. You need to be able to see in such a
way that only tiny head movements are needed to be able to see the subject and
the drawing. The time between looking and mark making needs to be as short as
possible.
Only glance at your drawing every 20
seconds or so to check that the drawing is in roughly the right place.
Take any subject that it is possible
to look at. This could be a photograph, building, person etc. Look at what it
is you are interested in and try and remember as many details as possible. Try
and take a break from looking and examine how many details you can see in your
head. Once you feel confident that you can remember certain things,
now try and make a drawing of what you can remember. (Of course you are not
allowed to do this drawing by cheating, once you have looked and remembered don’t
look back). Think of Gainsborough and his flights of stairs.
Build this drawing over time, going
back to the source when you cant remember any more.
Do the same exercise but this time you
can only build relationships such as angles between things or the main masses
of darks or lights. Do not draw things, just how things relate to each other.
Use your critical ability to keep
extending possibilities. Is this a clichéd mark? If so what can I do to be more
inventive? Am I discovering something? If so what?
All good drawing is a discovery, most
of it is of course making images that can be tested against each other and as
this happens new languages are formed.
Sharp looking
The aim is to produce an analytical,
well observed, detailed drawing of contours by using only short straight lines.
This drawing should require you to slow down the process of looking. You will
need to look.. make a decision… make a mark… look… make a decision… make a
mark.
Use a very sharp pencil, making all
your marks from the wrist. Non of your marks should be bigger than 1cm and some
as small as 2mm. Start by making a short
sharp, intense mark. Make a second then a third mark, slightly overlapping each
successive mark so that they become linked into a continuous contour. Continue
making these marks to define your first contour edge. Keep these marks as sharp
and intense as possible. Don’t let the pencil become blunt. If you need to, rub
out with a sharp edge of a plastic rubber and re-insert as you go along. Draw
around curves even small ones with small straight lines and change direction of
these lines to find the curve. As you develop the drawing find your way into
internal forms, looking for shapes, perhaps edges of shadows as much as objects
themselves. As you develop the ‘boxing in’ of the drawing, start to think about
mark weight, some areas might need to be slightly lighter than others, others
darker, this will make you develop your ‘touch’ and allow for a greater
understanding of atmospheric perspective in relation to edge/mass
relationships. (In atmospheric perspective, sharp dark marks tend to come
forward and lighter marks sit back into the picture surface) Start doing this
with large forms and as you progress work towards smaller shapes.
Repeat the above and this time start
to build hatching strokes into the drawing in order to define tonal variation.
These drawings should develop careful
and decisive looking. As a result of slowing the process down, your decision
making should have become noticeably more accurate.
3. Technical
approaches
Technical approaches to drawing can
produce very powerful and convincing images. (For instance in the recent Henry
Moore exhibition of Denis Oppenheim’s work, there were large technical drawings of his proposed machines) However there are several
approaches to this and each one gives you a totally different end result.
Start by choosing an existing drawing,
this can be of anything, because it is the format chosen that will shape the
drawing and give you a new image.
Start by making a flat gridded sheet
of paper and on this plot a plan view of your chosen drawing. Then make a side
view of it. If your drawing appears to you as flat, don’t worry, try and
invent some high points and low points and then try and do this with a plan
view as if cut through the centre and then on the furthest side away from you.
These drawings in themselves may already be interesting.
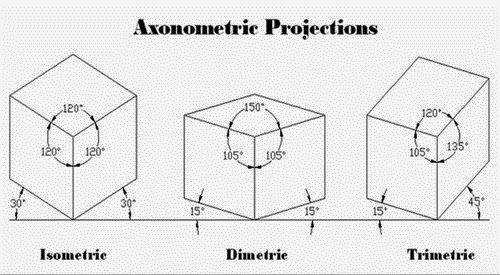
Use the information gathered to try
and make four Axonometric
projections, including isometric, diametric, trimetric and oblique. By making drawings of plan and elevations
of your work you will have already developed some Orthographic projections.

Oblique projection
Once you have the
idea of these four different ways of doing technical projections start to make
a large drawing (at least 2xA1) that stretches your understanding of how an
existing flat drawing can be pulled into an axonometric space. Try to think
about atmospheric perspective and mark diversity as you build these drawings in
order to keep your mark-making invention subtle and purposeful.
4. Finding the core
If you are having
problems working from photographic imagery you could try this exercise. Cut 20
sheets of A5 good quality watercolour paper from existing A1 stock. Mix at
least 6 grades of grey ink, going from very light to dark almost black. Keep
each tonal grade separate. Select six watercolour brushes of different sizes.
Working from a
selected images work quickly using the largest brush and the lightest ink on 10
sheets of your paper. Try and capture the essence of the image but do not get
into detail. Do this again on the next 10 sheets this time working wet on wet.
I.e. dampen your papers before using them.
By the time you have
finished the last wet on wet image the first of your initial 10 images should
be dry enough to work over.
Before doing this
however look at all the drawings you have done and see if any are interesting
in their present state, if so remove from the pile and keep for later.
This time select the
next tonal value one step darker and repeat the process using a slightly
smaller brush. Again work quickly, this time you have a faint image to guide
you and this should help your positioning of mark and tone. Once all 20 are
done, (wet on wet images might need re-dampening) again line them up and select
out any interesting ones, then move on to the next darkest ink and next
smallest brush. Keep doing this until you have used the darkest tone. Now put
up an exhibition of all 20 images.
PS When I first did
this we worked with 50 starting images, so if you are feeling ambitious up the
numbers.
Look at the work of
Marlene Dumas and June Glasson in particular her series The Foulest of Shapes. http://www.juneglasson.com/the-foulest-of-shapes/#1
On completion you will have a series of images of varying tonality and with
a variety of mark qualities. Hopefully this series of images will allow you to
start to develop a personal language with which to deal with photographs within
a drawing context. One of the biggest issues with a photograph is what is often
called the ‘tyranny of the image’. It is sometimes very hard to break through
the ‘it looks like a photograph’ barrier. Once you have made these images, some
of the worst ones could be re-cycled again, this time working on top of them
with pen and ink.
Losing and finding
Take any of your existing images that are on paper, (in particular ones
that you don’t think work or are poor) stretch them* and when dry, paint over
them using slightly diluted emulsion or use white chalk on dry paper to do a
similar thing. You should be able to see a ghost of your old image underneath.
Now start picking out what you feel was most important about that image and
re-draw using whatever materials interest you. (Ink and brush, pencils and oil
pastel, charcoal and graphite etc.)
If you think of a drawing as the creation of a problem which is then
solved, then what you are doing is discovering a problem starting with, “why is
this drawing not good enough?” What remains is then the struggle to reveal what
the drawing is becoming about as well as what it was about. This is a type of
compacted time, the compacted image that results being about resurrection and
re-establishment.
What you will gain from this is a process for rescuing drawings that might
otherwise be discarded. It will also allow you to value mistakes and use them
as a tool to enable you to make progress.
“Drawings reveal the process of their own making, their own looking” John
Berger
*How to stretch paper
If you have never stretched paper before there are lots of useful videos on
YouTube such as: http://www.youtube.com/watch?v=X_uedfZuvXo (Also read the comments below, as people have picked up common problems)
My tips would be make sure you use good quality brown gum strip tape, (don’t
try and use masking tape) and a large plywood board that has been thoroughly
washed beforehand to make sure no binding glue is left in the top layers of the
wood. I have also found it useful to only wet the gun-strip lightly as too much
water means it slides away from the paper as it pulls tight.
To get a sense of why paper is like it is see: https://www.youtube.com/watch?v=idb-42TJl7U&feature=plcp
See:
Is drawing a language?
No comments:
Post a Comment