Showing posts with label Sooty. Show all posts

Monday, 24 March 2025

Stained glass: Finishing

The finished panel

As you can see from the image above the stained glass panel I have been working on for over a year has finally been finished. It's approximately A1 size and it was designed as a response to the fact that when I started the project I had plantar fasciitis, which meant I couldn't put my foot down without extreme heel pain. As I had been making votives, I decided to use the idea of Sooty as a type of voodoo fetish, interceding to bless the pain and therefore release it. It did eventually go away but not I suspect due to the intersession of Sooty. Even so it was an interesting experience and I have learnt a lot technically and have set up my workshop to be able to undertake quite a few of the glass skills used during the past year. The painting I started out with is this one below, and as always its fascinating to look at how a change in technique totally changes the meaning of what can be almost exactly the same image. 

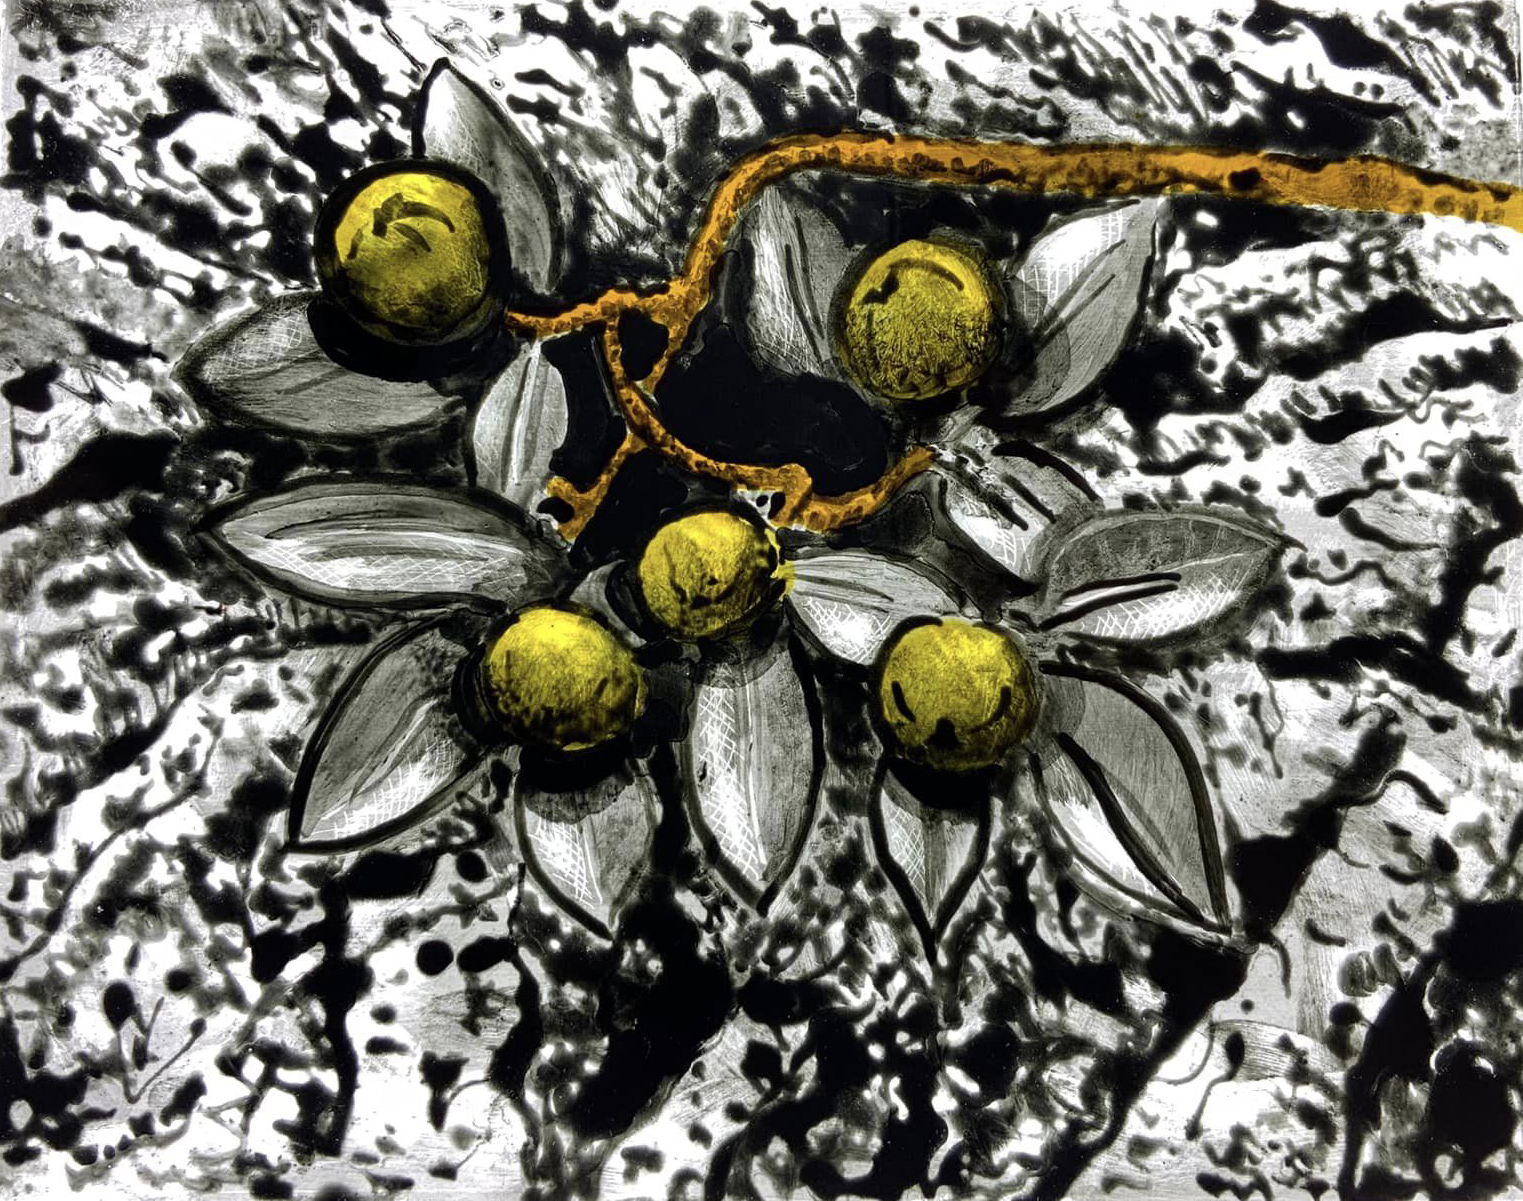
The original painting 

My last post was about the soldering process, which left me with lots of cleaning to do, most of it due to the deposits of tallow still left on the lead. Once the tallow had been cleaned off the next step was to stabilise the panel with black putty, which  ensures that every section is held securely in place. If the panel was to be used as a window, it would also need to be made weather proof and this stage would ensure rain water would not be able to penetrate it. 

Black putty being applied to all the gaps between the lead and the glass

I had bought myself a tub of stained glass putty a while ago, so had it ready. It's much more expensive than the putty you use to secure the glass in a window and I suspect you could mix your own by staining ordinary putty black but I was in a rush to get everything finished, so had bought a ready mixed tub. There is nearly always a reason for the materials being what they are and when I have tried to go my own way, such as using ordinary soldering flux, things haven't worked. 

Stained Glass Lead Cement Putty Black 1/2 PINT (Approx: £26)


I used an old toothbrush to push the putty into the gaps between the leading and the glass. I was amazed at how much putty would be needed to go into these gaps, and it takes quite a while to work it into each section. A circular movement of the toothbrush seemed best, and as the putty began to settle into the spaces, it lifted off the glass surface. (I was initially worried that it might stick to the glass and be hard to clean off). 

The toothbrush: The black putty is very sticky, like thick runny hunny.

As the gaps become filled, the putty pulls away from the glass surface. 

I then, once all the gaps were filled on one side, with help, I turned the panel over and repeated the process. I had some whiting power left over from when I was printmaking and once the putty was in place on both sides, dusted one side with it. This is to help dry the putty and clean off the panel. Using an old scrubbing brush, I then worked my way across the panel, again using a circular motion and this removed bits of excess putty and at the same time cleaned the glass. This was then repeated on the other side.

Using an old scrubbing brush to remove whiting powder and excess putty.

The window was at last beginning to look how I wanted it to. The too shiny look of the solder had gone, the black of the putty now filling every crevice of the surface, which makes the whole panel look as if it is an old thing; something made back when stained glass was a process embedded into a deeply spiritual way of understanding the world. I was beginning to think that all the effort was at last going to pay off. 

The final part was to get the 'look' of the leading right and to do this I used black stove and grate polish. (£7)
'Stove black'

I used to help my nan polish her black iron stove and this was very like the Zebo polish that we used then. When buffed up with a soft duster or rag, you get a rich dull black, which is what I wanted. These final touches were vital as they gave the panel a very personal feel. The surface looks very hand done, the final finish looking like something that has resulted from several hours of intense one to one application. The Sooty window was meant to be a type of fetish or votive and by virtue of the many hours of work invested into its making, it has human spirit built into it.  


Developing the final patina by polishing

This final part of the process felt intuitively right, perhaps because of the link back to the time helping my nan polish that old black iron stove. 

In order to have a good flat light source behind the panel, I ordered an A1 size, LED lightbox from Amazon, and it fits very neatly, I used it to light the window in order to take the photograph at the top of this post. 

It has been a long and expensive process, I have learnt a huge amount and made a piece of work I am very satisfied with, as it extends the conceptual as well as the emotional and spiritual range that I am trying to communicate with. I have also set up my old studio in such a way that I can now cut glass and grind it into shape, I can cut lead and fit panels together, but what I cant do is paint the glass without access to a specialist kiln. My objective was to see if I could become self sustaining in relation to a craft that I really feel does enhance spiritual 'feeling'. But the reality is that it will have to be a 'supportive' skill, one I use occasionally to enhance my work, rather than as a main focus. 

See also:


Wednesday, 13 December 2023

Stained glass session seven

I needed to catch up on myself a little, so this session was one where I had to re-cut the glass I broke as well as speed through the painting process, so that I did not have one piece left behind. 

The leg sections after the first firing of the water based paint

After checking that the painted sections of the leg had fired ok, I found the last piece of pink glass big enough to cut the foot shape from again. I'm now fairly confident about cutting, so managed this without mishap. The issue was could I catch up with the painting? I therefore went back to the water based paints, ground the edges down and washed my newly cut foot shape and laid a matt ground and blended it as I had done before. I then left that to one side and began the process of oil painting.

Mixing lavender oil into the dry paint

I had bought a small bottle of lavender oil from Boots during the week, (£4.70) as I knew this would be needed and as I had had a cold it had the added bonus of its smell helping to keep open my airways. Again, as with the water based painting it was important to add the oil very carefully, blending and blending with the small palette knife. 
Once mixed a fine sable brush was used to apply the paint. I had used this technique before and I wanted to use a version of the way I had handled the paint again. I also had a choice as to whether or not to oil the glass surface with the lavender oil before I started, as this can help flow. In this case I decided not to do this. 

Previous example of my stained glass painting, with silver staining for the yellows

The area of paint that surrounds the central image was done using an oil painting technique, over the top of a previously fired water based layer. I was using an almost 'pointalist' technique and liked the way I could use it to vary tonal values. 

Detail showing how the oil paint texture has to be applied to flow across from one piece of glass to the next. 

Painted section now with the foot completed on a switched on light-box

Once I was feeling confident that I could get the quality of image I wanted, I added in the water-based section, painting directly on top of the unfired tone and line drawing. I had to be vary careful not to touch the surface, as this would remove bits or leave marks, but by using a bridge I was able to put the two methods of painting together, so that the foot section could be fired at the same time as all the other leg components. 

Leg section as it appears when the light-box is switched off

You need to keep switching the light-box on, so that you can see how the glass will look when light is behind it. However because the leg section is a long one, it is slightly too long to see it lit all at once. 

Cleaning the brushes was done with neat lavender oil, a paper towel was soaked in it and the brush gently worked into the towel until it was clean and all the time trying to ensure the tip is kept pointed. 

The next area to work on is the figure of Sooty and this is quite problematic, as I need to find a way of making the image work for stained glass. My idea is that the Sooty figure is a sort of fetish and as such is rather like a religious icon. Therefore the style of rendering must indicate this. However first of all the pieces that make up Sooty have to have their edges ground down to remove all the sharp areas that might cut into the expensive brushes used to lay grounds and finally the surfaces are cleaned by being given a good wash in soapy water. 

White Sharpie numbering used to identify where all the parts go

All cleaned and edges ground down

These pieces are now all ready to paint, but I now had to spend time getting my head round how I wanted the final image to work. 

I had an earlier study made to help me think about how the image of Sooty would fit into the surrounding cut glass fragments but it wasn't right, it did though point the way.

Study: Acrylic Paint

The study did not take into account the various different tonal and colour values of the glass that will actually be used. The eyes are in the wrong place and the ears are wrong, but I liked the idea of making Sooty hirsute, it feels more Medieval. Therefore I returned to the cartoon and developed the image of Sooty, to more accurately reflect the decision making that had occurred during the process of cutting glass from fragments that were available in the studio. 

The stained glass Sooty before silver staining on the back: Cartoon study

Thinking about the fetishistic hairyness of Sooty

To complete Sooty the eight pieces that make up the body will need to be visually cohered and to do this the two clear sections of glass will need to be silver stained on the back, this will even out the colour, making it a varied but intense yellow and hopefully add to the fetish/religious relic effect. But I think it will be the painting of the texture and how it is done that will signify the ritualistic nature of the image as fetish. 

From the Vyne Chapel, Sherborne St. John, Hampshire: 1525


In this beautiful image of a dog from Sherborne St. John, you can see overall tonal modelling, as well as texture, and it is something like this that I think I want to achieve. 

Lamb of God

The sacrificial Lamb of God is closer to the concept of image as ritual fetish. The texture is modelled to give an idea of weight and volume to the lamb as a 'lamb', but the lamb is also a spiritual thing, a substitute for Christ. 


Tuesday, 10 October 2023

Why I'm making animist images

A while ago I put up a post asking questions as to why artists continue to need to draw animals. I have also referred several times to the fact that I believe that many artists need to also be 'animists' if they are to make images that connect humans with the rest of the world. So I thought it is perhaps about time to revisit the subject.
I have been making a series of images that relate to my boyhood and the fact that for a while I had a Sooty puppet that I definitely in my mind entered into when I needed to commune with someone or something that was both other than myself and yet at the same time an extension of myself. My mother was a cinema usherette, sometimes her shift was still ongoing when primary school finished, and so I would be told to walk up to the Gaumont cinema and go in and wait for mom, who would collect me from the back row, as soon as her shift had finished. It was a magical time, watching films that were far too old for me, that were sometimes totally incomprehensible, but which were still amazing. Faces were huge things, the horrors of two people kissing on such a scale were intensely embarrassing for me, and everything was seen as always in those days through a haze of cigarette smoke. To protect me though I had Sooty and Sooty would watch the films for me, he would interpret and go places I couldn't, sometimes in my mind even leaving my hand and engaging directly with the film world. Looking back at the way I related to this small golden coloured puppet bear, I suspect my relationship with it was little different to that of people who believe in animist practices.
Native Americans believe the spirits of animals and associated spiritual powers dwell within animal fetishes. These powers may be invoked to aid and guide the possessors of these fetishes, and in particular in North America there were six animals that were and I presume in some areas that are still occupied by indigenous peoples, still are, designated as being most powerful. They also acted as guardians of the six directions: North: Mountain Lion, West: Bear, South: Badger, East: Wolf and then the Zenith or upper region is guarded by the Eagle and finally the Nadir or lower region is presided over by the Mole. As well as these guardian duties these animal spirits also take on wider roles, so that for instance the eagle is the messenger between Earth dwellers and the spirits above. The bear as well as being a guardian of the west, has an ability to pass on to its fetish owner a portion of its own strength, it is supposed to help in processes of introspection and can use its spiritual strength to help empower the soul of whoever is locked into the bear/human fetish relationship and in this way the bear is also able to help lighten emotional burdens.  
Bear and other fetishes are still being made, especially by Zuni craftspeople, an indigenous people who not only made fetishes for their own use, but for other tribes as well. 

Zuni Turquoise Bear Fetish by Leekya Deyuse, c.1940

The bear fetish above was carved from a single piece of natural blue turquoise with a brown matrix. Attached to the bear with sinew is a shell carved into an arrowhead form and 'heishi' beads. The tying of these objects to the fetish would have allowed the bear's power to be absorbed into the tightly connected objects. For instance the beads might eventually become attached to a bracelet, the bear's power then would help protect the bracelet wearer.
My earliest memories of associations with what I now think of as being animal fetishes, were of a stuffed octopus and my Sooty puppet. Both these creatures played a powerful role in my adjustment to the world around me and they mediated between the known and unknown, as I began to make sense of who and what I was.

Ceramic octopus fetish made from a memory of a fabric one

Ceramic Sooty fetish made from a memory of a fabric one

As a man remembering being a boy


Sooty in the cinema

Looking back I can now see what was going on as a type of powerful fetish magic, especially as Sooty was supposed to be a magician. By casting my mind back into the world of a young boy, if I try hard enough I can begin to believe again, or at least get a sense of what these fetishes meant to me at the time. Although many people will I know see these images as childish things, I see them as intimations of a type of innocence we lose as we get older and by taking them very seriously, I am trying to re-create the intensity of the feeling tone of the time and am suggesting that it only takes a moment's reflection to step sideways and back into an older world when animist beliefs were central to everyone's experience. 


Sooty interjecting into various events

The more I try to make images that represent the spiritual or psychic power that I felt Sooty represented to myself as a boy, the more I find myself trying to build an intensity of colour to suggest the heightened emotional feeling tones that were associated with those very intense experiences. However if I am to take this even further I decided that I needed to appropriate what is usually seen as the most spiritual form of religious image construction, stained glass window making. 

Therefore the next series of posts will be my attempt to explain how I managed to achieve this with a bursary from AN (The artist's newsletter).

See also:


Monday, 25 September 2023

Images as ghosts

 
Rachael Whiteread: Nissen Hut

I sometimes think that all representations are like spectres or ghosts. So what do I mean? There are various overlapping issues here. For instance representations are frozen at the point of their making, whilst the things represented carry on changing and ageing and they eventually die or wear away. Although the representations are also wearing away, they often take longer to fade out of existence than the thing represented, hence they become rather like ghosts of former things. For instance I have photographs of my father and mother, both died some time ago, but their representations, although now faded, are still with me. 

Ghost image of my father

My father died of a heart attack. He was cutting the lawn when it hit him. It was of course a tragic moment but once I had processed the fact he was gone, I needed to then accommodate or find a place for his death by making images about it. Perhaps this is one of the blessings of being an artist, in that you can externalise your feelings in moments like this. I ended up with an image that perhaps on reflection I tried too hard to embed layers of symbolism into; the hourglass/mower handle has broken, the grim reaper is now a lawn mower and my father's face, moon like is being eclipsed, all suffused in spectral white's and greys, the result of colour being selectively removed from the image. It was a necessary thing to do though and at the time I made several versions, some watercolour and ink, others using digital print processes to suggest the representation of something having gone or being removed by using the 'replace colour' function of Photoshop and replacing each chosen colour with 'white' or 'grey'.
Rachael Whiteread's 'Nissen Hut' extends the idea. She makes a mould from a still existing Nissen hut and then presents this 'ghost' or shell, as a white spectre of its former self. The Nissen huts were a common feature of 1950s landscapes, often built for army barracks during the war and then converted into cheap housing after it. I had several friends who lived in them when I was a boy. The Second World War is itself now a ghost, long gone, but during my time of growing, it was only just over. My father had been in the army and he learnt many of his ideas of fatherhood from his time in service. My father and the Nissen hut were both shaped by war and therefore you could say, so was I. The world of the 1950s is now also a black and white ghost. Photographs and films from the time frozen in a colourless world, one that exploded into technicolour during the 1960s, and on the advent of the Beatles, was coloured in as new aspirations began to appear as if by magic in front of our very eyes, life becoming a Magical Mystery Tour rather than a grim reality. 

Father enters the land of the dead, still pushing his lawn mower

Ghost mower: 2nd version

There are other ways to think about images as ghosts, one is in printmaking when after you print off a plate, there is usually some ink left on it. If you print again what you get is a “ghost print”, a much paler version of the original. In drawing you can do something similar. If you make a drawing in chalk or charcoal, you can place a damp sheet of paper on top of it, smooth it down to make a good contact and then peel it off. You now have a ghostly image of the original in reverse, which is called a counterproof. You can also use image transfer techniques such as using acetone to dissolve the ink used to print an image, which allows you to lift the toner off a printed image and apply it to another surface. As the image is transferred it leaves behind a fair amount of ink resulting in a more transparent image than the original, that can feel very ghostlike.

Rauschenberg: Image transfer

When making a monoprint by painting on a glass sheet, by pushing a sheet of paper into the oil paint once it has been manipulated to form an image, an artist can pull off individual prints by either burnishing the back of the paper, or if the image is painted into a metal sheet, by sending the plate and paper through an etching press. The final result is often an image with a 'ghostly' feeling, as it is a trace or fainter impression of the original. Degas was a noted user of this technique, as he found it a very good way to 'discover' imagery, when he was thinking about possibilities for painting. 

Degas: Mono-print

Perhaps all images are ghosts, faint impressions left over from encounters with reality. Derrida would argue that we are all haunted by the return of old ideas that rise up out of the past like ghosts. He calls this aspect of our lives, 'Hauntology' and he explains how it works in his 1993 book 'Specters of Marx'.

The older I get the more old memories seem to arise unbidden, again like ghosts they begin to haunt my everyday reality. In particular my old hand puppet, 'Sooty' has begun to arise unbidden into my thoughts about what is going on now, it slides ghostlike into view, turning my thoughts into snapshots from some sort of long gone stage-play or silent cinema. 


The ghost of Sooty engages with a cinematic world

See also:


Vanessa Baird: Also some thoughts about images made on the death of my mother

Western World A book concerning the ghosts of a cowboy past