Showing posts with label Drawing excercises. Show all posts

Friday, 17 March 2017

The practice and science of drawing


The Practice and Science Of Drawing, by Harold Speed was a classic book of its time. Published in 1913 it set out to give a fully rounded introduction to drawing, both as an observational practice and as a means towards developing composition and expression.

Speed has some interesting observations and is very opinionated when it comes to critiquing other artists. The book reads as if it comes from another world, an age well before modernism, but you need to remember that Cubism and early abstraction were already well established in mainland Europe when it was written.

However when he gets to unpicking why he doesn’t like academic approaches to drawing he has this to say about too much precision.

‘There must be enough play between the vital parts to allow of some movement; "dither" is, I believe, the Scotch word for it. The piston must be allowed some play in the opening of the cylinder through which it passes, or it will not be able to move and show any life. And the axles of the wheels in their sockets, and, in fact, all parts of the machine where life and movement are to occur, must have this play, this "dither." It has always seemed to me that the accurately fitting engine was like a good academic drawing, in a way a perfect piece of workmanship, but lifeless. Imperfectly perfect, because there was no room left for the play of life. And to carry the simile further, if you allow too great a play between the parts, so that they fit one over the other too loosely, the engine will lose power and become a poor rickety thing. There must be the smallest amount of play that will allow of its working. And the more perfectly made the engine, the less will the amount of this "dither" be’.

The concept of a drawing having life comes up yet again, as it did in the previous post. In this case Speed comes up with the idea of ‘dither’ to explain it. However he also warns against too much ‘dither’.

I can see what he means, energetic markmaking for its own sake can become a mannerism and when it does a drawing begins to lose authenticity.

I think Speed’s book is a salutary read. It comes from a time when people could have firm convictions as to what is right and wrong about art, convictions now long denounced as outdated and obsolete in this time of post-post-modernism. 


His sections on composition like the one illustrated above, take me right back to school and those art classes whereby we had to draw out the various underlying dynamics and geometries of a painting’s structure.
Even though no longer taught (well not in most undergraduate Fine Art courses in England), it is still useful to go back and look at how an awareness of these things was achieved. I have seen so many poorly composed images or even worse images that have no conception of a relationship between surface organisation and meaning, that I personally believe it would do no harm to look again at these things, even if simply to consign these ideas to history. At least people would be able to make a decision as to why no compositional construction is needed or how their approach to constructing a figure differed from more traditional methods.

Speed himself saw his approach as being modern. He wanted to free students from the tight constrictions of the academy. He is one of the direct antecedents of the staff that now teach cutting edge contemporary practice at Goldsmiths. He indeed uses an example of student work done in classes there to illustrate a point. I went to art college nearly 60 years after this book was published, the book is now of course over 100 years old, so my art school experience should feel as out of date now to contemporary students as his did then to me. 

England was slow to take on the lessons of Modernism, but when it did it took the teaching of the Bauhaus to heart and the institution I now teach in was at the forefront of the radical change to art education when it finally happened in the 1950s and 60s. 

However I’m always worried about throwing out the baby with the bathwater and when you look back, you can always find things of interest. So why not read this book and see if there is anything in it that still makes sense to you?

Download here The Practice and Science Of Drawing, by Harold Speed 

Compare Speed's book with earlier writings that influenced him.

In particular Hogarth'sThe Analysis of Beauty  and SirJoshua Reynolds's Discourses

The further back we go the firmer in their convictions art educators become. As Reynolds states in relation to the setting up of the Royal Academy: 'The student receives at one glance the principles which many artists have spent their whole lives in ascertaining; and, satisfied with their effect, is spared the painful investigation by which they come to be known and fixed.  How many men of great natural abilities have been lost to this nation for want of these advantages?' 

Compare this situation to contemporary books on drawing practice. For instance 

'Drawing Ambiguity: Beside the Lines of Contemporary Art' published by 'Tracy' the collective name for the centre for recent drawing in 2015, has this to say about drawing; 

'A position of ambiguity, a lack of definition, is not only desirable within fine art drawing but also necessary - having the capacity to enable and sustain drawing practices.' 


See also:

Monday, 1 February 2016

Is drawing a language?


There are several different arguments surrounding the notion of drawing as a language, but after working as an artist that makes drawings for well over 40 years I thought I might as well add my pennyworth.
In terms of verbal languages, I have only learnt two of them. My native Black Country dialect, where both intonation and vocabulary were specific to a very small geographical area, which had words in it's vocabulary like ‘tranculments’ that I have not found elsewhere, and my educated English that I perfected when I left the area, because if I was to advance in my chosen profession I had to appear ‘educated’.I learnt both these verbal languages by imitation and repetition. As new words came into my vocabulary I would try them out and if I was successful in using them to communicate concepts I would use them more. I am still adding new words and more importantly new ways of putting the words together. I learn by listening and reading, for instance this week I have been reading Ali Smith’s‘Artful’ a wonderful book that has shown me how I could begin to mix different writing languages together and yet still maintain an overall ‘voice’. Not only has her book helped me think about my own writing style, she has made me think more carefully about how I construct visual images. She has made me see the poetry in ‘skimming’ between personal anecdote, to a re-reading of Dickens via the poetry of Shakespeare, whilst a 1960s pop single’s lyrics ghost their way into the sub-text of a thought.
Although reading someone like Ali Smith can help me think about how sophisticated a written or verbal language might be, it doesn’t change the fact that I cant read or listen with any understanding to someone writing or speaking in Russian or Chinese. This points to something fundamental; language is a representational system that uses learned conventional signs or schemas to express concepts. ‘These schemas are stored in memory and can be combined to create infinitely possible novel expressions’. (Cohn, 2012, p. 169) The key issue is that these schemas are learnt.
So lets look at my visual ‘languages’. I had learnt a certain type of ‘observational drawing’ language before I left school, this language relied on making representations of what I was looking at, flowers, other schoolboys, local landscapes, still-lives and above all glass bottles, by copying what I was looking at using a certain type of pencil shading.


Typical shaded bottle drawing, that within its set of conventions would get a good mark

This shading tended to be ‘smoothed’ out, as it appeared at the time that you got more praise the better you got at making smooth transitions. The model for these drawings was the school art-room wall of excellence. You saw what had been picked out as good and if you had enough hand eye control and were actually interested in the work, you realised you could emulate the best and even try to be better.  Once it was seen that you could control 'shading' you were given a more complex task which was to set out the relationship between objects. It was only at this point that you began to see that the complexity of a drawing situation, was strangly mirrored by a growing simplicity in the final look of a drawing. The penny took a while to drop, but eventually I realised that 'abstraction' was at the core of this process and that abstraction demanded you activly looking for something, in this case (below) simple geometric relationships. Shading was in effect giving you everything and nothing at the same time.


Alongside this observational drawing language I was also introduced to Paul Klee's Pedagogical Sketchbook, so I began to use point, line and plane as separate formal elements within a purely abstract investigation. I was shown the work of Kandinsky, Mondrian and other artists so that I had clear models to learn from.

Alongside these school languages I also developed a ‘cartoon’ or street language, one picked up from newspaper cartoonists such as Giles and the various artists who worked for the Topper, Beano, Eagle and many other boys comics of the 1950s, and the what were then new American imports such as DC comics. This visual education would flower in the early 60s, with the arrival of Marvel comics and the visual excitement of Jack Kirby.

If you look at this academic drawing of an arm below, you will see that the artist has worked hard to show you how the muscles of the arm connect.


However if you look at the same area of the body in a Jack Kirby drawing you will see that there is no correspondence with reality.


Kirby made me realise that all you had to do was develop a 'convincing' language, your drawing didnt necessarily have to be right. I still use the lesson I learnt from Kirby, he taught me a whole new way of thinking about 'rightness' in a drawing.

When I worked at Round Oak steelworks I learnt a more technical language, the use of rulers, compass, set-squares and French-curves allowed me to describe machine parts and this language I further refined when I went to work as an industrial interior designer on leaving art college. It was a specialised language, and it was very precise, I could send a drawing to a technical team who could build something from my drawings.


On going to art college I was first of all told my existing drawing language was very poor and that I needed to learn a new one. Pencil shading was too imprecise and had no emotive range. I learnt to develop a much wider range of marks, (this enabling me to think more carefully about emotional register) and learnt to think more deeply about form, learning to use drawing languages that much more accurately described the experience of understanding a 3D form, such as the use of cross-contour drawing, chiaroscuro to add emotional intensity as well as form modeling, the use of measurement within a perceptual search, to suggest both accuracy and indeterminacy at the same time, the use of one, two and three point perspective to give conviction and authority to both individual forms and the space that they sat in etc. each new expressive tool was regarded as part of the overall language of drawing. However some aspects of the language were given more emphasis than others, for instance copying using pencil shading was seen as a very dumb language, but gestural liveliness was regarded as a language akin to music. The models for all of these various languages were images shown in slide talks given by staff, the studio walls whereby critiques were used to highlight best practice and of course art books and magazines, which in my day were mainly illustrated in black and white. In this way you learnt the various registers of visual language, each one learnt within a special situation that highlighted what the language was best at describing or communicating. For instance in order to examine perspective and the construction of precise line drawing, there would be a still life built in the studio that often had a gridded floor-plan and objects to draw that were composed of cube like units, together with cones, cylinders and spheres, i.e. objects that were made of geometric elements that could be seen to have edges between significant surfaces. Drawings that explored rhythm and energetic marks were restricted to the moving model or trying to draw moving water in the landscape. If you were looking for mass within a perceptual search for space, you might well be asked to explore this in the life room. You would be told 'it's not what it is, it's where it is'.


The life room was where I began to realise what Kirby was doing and what we were being asked to do was very similar. You were searching for something and when you found it, it had a certain conviction or authority. In the case of the drawing above, the lines searching for relationships are fused with the marks searching for mass, the figure and the space it sits in arriving together.
You gradually became aware that you needed to choose your language carefully in order to be able to express something about the character of what you were looking at. In a written language this would I presume be choosing to use a poetic register to write about a particular feeling such as loss or nostalgia but switching to a more journalistic style to report on what happened when you went to the post office to renew your car tax.
These languages were I would argue learnt in exactly the same way as a verbal language, however the native speakers of these visual languages were the art tutors and artists that I was at the time coming to see as my new ‘family’ and if I wanted to belong to this family I would have to learn the language.


The image above shows Victor Pasmore teaching at the Scarborough art summer school, and the work surrounding him was to be very typical of work produced in Foundation courses throughout the country in the 60s and 70s and this was the case when I entered what was then a  pre-diploma course in Wolverhamption in the late 1960s. Even though individuality and expression were seen as very important, it seemed to me that drawings done in art college at the time were actually very conventionalized. The best students were like those good at ‘foreign languages’, very good at picking up on what was going on around them and being able to ‘ape’ the look and feel of the visual language used, (Austin would call this pretense behaviour) and then if they were bright enough going on to be able to use these languages with a certain level of ‘understanding, (pretense behaviour assimilated as Austin would also say).
So if all the languages of drawing (and therefore I would argue, painting, sculpture and other various mixed media art forms) are actually learnt conventions, where does the art come in? Again I would argue that it’s very similar to the development of all other learnt languages. The more you look at the language you use, the more you become aware of it, the more you use it the more adept you become at controlling its nuances. The reason I was enjoying Ali Smith’s writing was that she was really playing with the written form and making me re-think about it again. I.e. the more we engage with others trying to make sense of a way of communicating, the more we will learn about the possibilities of using any particular communication platform. Of course you also need experience of the world in order to have things to say, but it is in the eloquence of what’s said, the way that the language is used so that things are remembered because of a special conjunction of elements or the way that a new perspective can be opened by shifting the format, that will be at the end of the day the most important thing. We all have experiences, they are impossible to avoid, but not everyone can communicate how their experiences can become universal, how their particular ‘petit sensations’ can be made into something that another individual can not only understand but feel an emotional connection with.
However I also feel that there are certain power brokers out there that ‘privilege’ certain visual languages over others. At one point film wasn’t regarded as a proper art form, neither was photography, in the English speaking world the comic book format was regarded as one for children, not so of course in Japan and there are always arguments and debates as to what constitutes good writing or the best of fine art. I suppose that at the end of the day all you can do is keep trying to say what you want to say, and to keep trying to understand your medium, the more art you look at the bigger your visual vocabulary will be, and like a writer, the more you become aware of other ‘voices’ the more your own voice can be honed. 
It's interesting to compare how the two traditions of writing and drawing are taught.  To begin with we have to acquire the basic skills, in writing I can still remember shaping the individual letters over and over again, and then once you could accurately draw the individual letters and put them together to make words, you then had to learn to join them together, to move on to 'joined-up writing'.


This before spelling, syntax, meaning etc. was ever discussed. However we then started spelling 'Bs', which were based around the learning of spellings by rote and then of course as you learnt your words you had to practice reading and certain set books were given, 'Janet and John' in my case. Once the basics were over, only then did you begin to think about writing something with content and when you did it might be to write a poem, or to write a passage about a set subject. Basically writing was seen as something that took years of practice to develop. Drawing on the other hand was initially just something you did, you were given crayons to play with and then occasionally you were asked to draw something, often for special occasions, an Easter card or a Christmas card, you probably did more drawing on the covers of your exercise books than in any set session. I remember in a history class being asked to draw a castle, but because drawing was seen as something you just could or couldn't do, there was no support or help for those that couldn't manage this, simply praise for those who could.  So no wonder drawing seems to lag behind literature in terms of nuance and sophistication. Ali Smith takes it for granted that her readers can not only read but that they are aware of a wide range of approaches to writing and the work of many other writers; her job is to uncover unearthed connections or little heard voices that only become known when someone like her points them out.  She is aware that the language of writing is an ever changing, morphing one, one that still echoes with the poetry of Shakespeare but that now has to acknowledge the rhythms of rap and the poetry of newspaper prose. It is in the unique mix of the moment and of the place that makes for exciting new writing, each writer has both a command of their own personal voice, and an awareness of how that voice sits alongside a plurality of others.  
The artist however is in a different position. Because so few people ever learn how to draw, there is a much smaller pool of people to draw from who can appreciate what a good drawing is. This is why  so many people 'like' drawings that look like photographs, they mistake one thing for another, its as if people mistook writing for sound recordings. A sound recording has a one to one, what is called 'indexical' relationship with reality, writing doesn't and we don't expect it to, but sometimes we do write sentences that are meant to echo speech patterns, we call this writing dialogue, but we never expect it to be exactly the same as a sound recording. This is because we have a very sophisticated awareness of what the written language is, and we are forced to use it, just as I am using it now, to explain all sorts of things as well as to communicate emotion and of course tell stories. 
So back in the world of drawing do we see the same things happening? I think so. I think we still see echoes of great draftsmen like Rembrandt or Goya in the way we depict people. But these echoes are mixed in with forms and shapes seen in comic books and newspaper cartoons. The rise of Manga has perhaps now pushed Disney into the background, but simple icon forms, like smiley faces and emoticons are now much more prominent in the visual arena.  We also have the total domination of lens based images. We see images made by a camera everywhere and these become the standards against which we measure other images. This has distorted our understanding of drawing, because it has in effect for most of us replaced drawing as a way to describe the world. Therefore, the important thing is how will this mix be refined and focused in order to create a visual language for someone making art today? What is interesting is that if you go to a creative writing class it will be accepted that you will have something to say, but what will happen is that you will be exposed to more and more complex forms of saying it. How does first, second or third person viewpoint change things? What if you write from the point of view of the objects in the room and not the people? Could you combine voices by using William Burroughs type cut-up techniques? Creative writing classes use tried and tested ways of tapping into how people can articulate what they want to say. Visual art forms seem in comparison to be so wide and open that it's often hard to know where to start. So on the one hand we have far less basic teaching in visual language and on the other the forms and formats possible are much wider and much more open to being broken and re-formed into new hybrid forms.
You will still find lots of 'how to' books, and these will follow an old formula, and provide you with basic schemas from which to approach the simplification of a complex reality. In this case we can see two very similar sets of drawing schemas for heads.


Working from an established model has been at the core of an artist's training for a 1,000 years, these drawings below are Durer's attempt to find a formula for facial proportions.

How to draw books are often derided as leading to cliché and stylistic dead ends, however people have to start somewhere, and from my experience these types of books can help a beginner sort out how to approach different drawing situations. But only as a primer, and not to be used as a crutch. However without the basic structures given to me when I began writing my letter forms, I would not have been able to write very well and as I draw now, I’m well aware of how more than 50 years ago, I avidly devoured those 'how to draw' books and used them to help me clarify some very basic drawing mistakes. For instance, the middle set of how to draw a head images above show you how to simplify and how to see the head as a simple mass. This helps you escape from the trap of drawings eyes, noses and mouths as symbols, and you are forced to begin thinking about locating features around a form.

So don't panic. Take things one at a time, think about how long it took to learn to speak and write English and then try and apply the same focus to learning visual languages. Try to look at as much art as possible, just as you would read around if you want to write, look at a wide range of art and over as wide a cultural and historical period as possible, try not to have favourites and try to work out why something may have survived to now sit in an art gallery as a famous work of art or why something in a contemporary art magazine is being cited as being good, even if you don't like the work. Above all draw, and draw again and again and dont be 'snotty' about basic drawing primers. 


One basic introduction to creative writing is to make the writer write and write and write. To keep writing until their hand aches and they feel they can't go on any more. But in doing this so many people realise that they do have a voice and that the hand knows this perhaps more than the mind. This is the same with drawing. You sometimes have to push it and push it, to draw as if there is no tomorrow, and to take on different styles and approaches, not to copy them but to appreciate how and why they work, so you can then use different elements from these other approaches to gradually and slowly build up a personal language that will be able to say what you want it to say, to look as you want it to look and to communicate things with a degree of sophistication and knowingness that is common to all rich communications in whatever language they are addressed in. 
I still use the skills in technical drawing I learnt as an apprentice, I find that some things are best explained that way, but of course many other things are impossible to say in the language of an isometric projection, the point being, without in the first place learning the language, I would not have the visual 'words' to say what I wanted to see. 

For a much more academic investigation of these issues see:
Cohn, N (2012) Explaining ‘I Can’t Draw’: Parallels between the Structure and Development of Language and Drawing Human Development 2012; 55:167–192 Available at: http://www.visuallanguagelab.com/P/NC_drawingdevelopment.pdf

 Find J L Austin's 'How to do things with words' here

I first read Austin when I was at Art College in Newport and his writing made me aware of how little we think about how languages actually work. 

Smith, A.  (2012) Artful London: Penguin 

Paul Klee's notebooks

See also:

Is drawing a language part two
Is drawing a language part three

Tuesday, 1 April 2014

Drawing Exercises

Drawing excercises are a well honed tool for getting going when feeling stuck. They are also useful in that they point to various approaches to drawing that are fundamental. Therefore I shall occasionally post a few up as examples for anyone to try when stuck as to what to do.


These are a few suggested things to do which act as ice breakers whilst you are thinking about what your subject matter will be and what drawing processes you will use.


1.    Developing your sense of touch


Rubbings and textural mark-making
Materials
Materials for rubbings: Thin paper, such as newsprint and photocopy paper or brass rubbing paper. Charcoal, Chinagraph pencil, soft pencils i.e. 4B/5B, children’s wax crayons such as Crayola, blocks of brass rubbing wax.
Materials for textural mark-making: As above plus a good varied range of artist’s brushes, dip-in pens which are available in various nib sizes, black acrylic, Indian ink, Quink ink, sponges both marine and synthetic, black oil pastels, black and white chalks and pastels.

What to do
Take rubbings of various surfaces, thin papers will let you achieve delicate marks and thicker papers may be used for very rough surfaces. Each drawing material will leave different traces so use a variety of these too. Try using different hand pressures and changes in rubbing technique, such as loose open gestures, then careful controlled ones.


The next stage is to examine textured fabrics that you can’t take rubbings from. Try to create marks that respond to the patterns or weaves of your fabrics, Find ways to represent the differences between each fabric or surface examined.

Try and make rubbings of various objects, some will appear clearly, such as an outline of a pair of scissors but some will be almost impossible to recognise because they are too complicated. 

Reference
Look at the work of Ingrid Calame and read what she has to say about why she draws.

Try using tracing paper laid over the rubbings to discover images or make connections between the various surfaces you have produced. 

Cut up and reassemble the various rubbings, in order to make images or abstract structures.


 Drawing your face or an object by touch.


Materials: Use any of the materials suggested for rubbings and textual mark-making. You might also need masking tape, black tapes and other non-traditional drawing materials. For instance using a broken comb to make texture by scraping it through an area of black boot polish. You might want to gesso your paper beforehand, so that you can scratch into it. Paper might be large roll size or small units of paper that you add to.


Try to work on large sheets of paper, and make sure you have the ability to extend these in any direction by cutting out extra rectangles and adding them to the initial sheet of paper. Don’t try and check what your face looks like in a mirror beforehand. Before starting to actually draw, you can make a feeling test. Close your eyes and feel your head with the hand you do not use for drawing. Starting at the back, think about how the hair gives an initial textural set of information, then press harder to feel for the bone beneath. One texture replaces another. Do not take your hand away in order to move it to another area, keep it in contact with the head, moving slowly over your head’s surface, once the back of the head is explored, the top of your head should be investigated, then the front, then the sides, some areas being touched several times as the hand makes its way between other sources of information. You are encouraged to feel inside noses, mouths and ears, to think about how a pair of glasses extends out from the surface of the head or how an earring may suddenly change the textural world.


Then make a palette of marks, make tests and try outs using different media whereby you are trying to make marks that approximate to touched ‘feelings’. Try scratching into the paper, especially if you have gessoed it. 


Once you have made your tests, finally you can begin drawing. Try to forget what a head looks like (this is impossible but the idea is that this drawing doesn’t need to rely on your memory of what a head looks like), and to begin feeling again before drawing.


Again you are encouraged to start at the back of the head, remember that when collecting ‘touch’ information, there is no back and front, just a continuous surface and starting at the back might help you to get away from the 'look' of the head. As you start drawing you are to invent surface information as a trace of passage. If you are feeling an ear, how does a mark change from hair, hair over bone to the cave like entry for the finger, then how does the feeling tone shift from open to closed surfaces? Fingers might trace their way across the top of a head and down over the front, moving over one eye and missing another. Alternatively a hand may be moving up from the neck, over the chin and then move left once the mouth is met and go on towards an ear. Fingers may of course explore the inside of the mouth and as this is just a continuous surface, the information should continue to just spread over the paper as you draw. The implication is that your body is all one surface, and even though you can't follow the implications of touching the inside of the mouth down into the stomach, you might be able to suggest the idea that this surface has points or areas that change direction and become holes. 


Questions such as the nature of up-ness and down-ness in a world without sight could be explored.  Is this drawing now becoming more about distance positioning? One eye is perhaps ten thumb lengths from the other if the feeling is done around the back of the head but only a single thumb length, separated by a nose bridge the other way. How do you know it’s the same eye that you are coming back to? If you were feeling someone else’s head how would the information be encoded? You ‘know’ the fingers have reached the nose if it is your own, but if you were feeling someone else’s head you might perhaps mistake one area for another.


Once the first touching exercise is done another approach is to draw a continuous ‘felt line’; this is done by drawing a line that stretches from the back to the front and to the back and to the front again. Starting with perhaps the left ear, the fingers feel over the front of the face (or back), to the right ear, around the back to the left ear again and onwards to the right ear again. If there isn’t enough room on the paper for the marks you can add an extension. Try and make the texture visual, as these are not drawings that will be read by touch, they will be looked at and the link between touch and sight will be what becomes interesting.

Once the drawings are done, consider making relief images from them or embroidery or re make the drawings back into 3D shapes. 

Drawing an object/objects by touch


Get someone to place an object in a bag or box that you can put your non drawing hand into. Don’t look to see what it is and don’t let them tell you what it is. Then using touch alone draw the objects/objects, using everything you have learnt from the drawing your face by touch exercise.


Your drawings should show a sensitive response to touch and contain a range of interesting felt marks. You are making an abstract translation of how your object feels, not a literal representation of how it looks. What is important is the synchronised route of communication between both hands and the transference of one sort of information (touch) into another (drawn marks).


Reference
Look at the work of Margarita Gluzberg and read what she has to say about why she draws hair.


Make two sets of drawings and then try and use one set to remake the object as best you can, finally you are allowed to look at the object. 


2.    Drawing and Memory


There is always a gap between looking and drawing, in that gap you forget things. This gap is though of vital importance in the development of ideas related to visual importance and conceptual weight. Gainsborough used to test his visual memory by setting up a still-life in his basement and putting his drawing studio in his attic. He would spend time looking and then run upstairs and draw until he could remember no more. He hated climbing stairs so worked hard to develop his visual memory.


Here are two ways to approach this issue.


 Bridging the memory gap


 Using a drawing board, pencils and cartridge paper position yourself in relation to your subject matter, (this can be a still life, landscape, person etc. but if stuck the best object to draw is a stool or chair sitting in space) so that you can only see your drawing paper out of the corner of your eye. You should be able to see only your subject clearly, not your drawing. Hold your pencil in a relaxed and comfortable way between your forefinger and thumb of the hand you don’t draw with and position yourself at arm’s length from the paper surface.


Without looking at the drawing and keeping your arm extended at a comfortable full length, start to push and pull the pencil around, trying to synchronise the lines you make with what you are seeing.


Keep your pencil in contact with the paper and move it continuously. (If you get tired take a rest, your shoulder muscles will ache as the drawing progresses so do give yourself a rest). Work slowly and keep to one continuous line. Twist and turn the pencil, sharpen it to a chisel end, press lightly and hard. Try to produce an unpredictable, awkwardly interesting line.


Make sure you don’t concern yourself with the drawing. Concentrate on the looking. Draw until you can’t do it any more; then finally look at what you have done. If you have to have a break, don’t be tempted to look at what you did.

Check this out


Part 2


Repeat what you did for the first drawing, this time using your drawing hand. You will need to reposition your drawing board on the other side of your body, so that you can’t see the drawing, as before only what you are drawing.


This way of drawing helps you get the idea of drawing as a discovery, as a process that allows new things to happen and it facilitates awareness. What you can hopefully do is develop a much better synchronised communication between the eyes and the hands.

Starting to look, but only occasionally


Set up as before, however this time if you are using an easel and drawing with your right hand, you may find it better to look to the left side of your board. You need to be able to see in such a way that only tiny head movements are needed to be able to see the subject and the drawing. The time between looking and mark making needs to be as short as possible.


Only glance at your drawing every 20 seconds or so to check that the drawing is in roughly the right place.


 Memory testing


Take any subject that it is possible to look at. This could be a photograph, building, person etc. Look at what it is you are interested in and try and remember as many details as possible. Try and take a break from looking and examine how many details you can see in your head. Once you feel confident that you can remember certain things, now try and make a drawing of what you can remember. (Of course you are not allowed to do this drawing by cheating, once you have looked and remembered don’t look back). Think of Gainsborough and his flights of stairs.


Build this drawing over time, going back to the source when you cant remember any more.


 Part two


Do the same exercise but this time you can only build relationships such as angles between things or the main masses of darks or lights. Do not draw things, just how things relate to each other.


 You should now begin to see the relationship between looking, feeling, memory, and responding having made a collection of marks that begin to ‘resemble’ your subject. These drawings will be somewhere between abstraction and representation.


Use your critical ability to keep extending possibilities. Is this a clichéd mark? If so what can I do to be more inventive? Am I discovering something? If so what?


All good drawing is a discovery, most of it is of course making images that can be tested against each other and as this happens new languages are formed.                                  


Sharp looking


 As a subject use any object or view that has interesting contour edges. This could be the human figure, the horizon of a landscape, edges of objects around part of the room etc.


The aim is to produce an analytical, well observed, detailed drawing of contours by using only short straight lines. This drawing should require you to slow down the process of looking. You will need to look.. make a decision… make a mark… look… make a decision… make a mark.


Use a very sharp pencil, making all your marks from the wrist. Non of your marks should be bigger than 1cm and some as small as 2mm.  Start by making a short sharp, intense mark. Make a second then a third mark, slightly overlapping each successive mark so that they become linked into a continuous contour. Continue making these marks to define your first contour edge. Keep these marks as sharp and intense as possible. Don’t let the pencil become blunt. If you need to, rub out with a sharp edge of a plastic rubber and re-insert as you go along. Draw around curves even small ones with small straight lines and change direction of these lines to find the curve. As you develop the drawing find your way into internal forms, looking for shapes, perhaps edges of shadows as much as objects themselves. As you develop the ‘boxing in’ of the drawing, start to think about mark weight, some areas might need to be slightly lighter than others, others darker, this will make you develop your ‘touch’ and allow for a greater understanding of atmospheric perspective in relation to edge/mass relationships. (In atmospheric perspective, sharp dark marks tend to come forward and lighter marks sit back into the picture surface) Start doing this with large forms and as you progress work towards smaller shapes.


Repeat the above and this time start to build hatching strokes into the drawing in order to define tonal variation.


These drawings should develop careful and decisive looking. As a result of slowing the process down, your decision making should have become noticeably more accurate.


3. Technical approaches


Technical approaches to drawing can produce very powerful and convincing images. (For instance in the recent Henry Moore exhibition of Denis Oppenheim’s work, there were large technical drawings of his proposed machines) However there are several approaches to this and each one gives you a totally different end result.


Start by choosing an existing drawing, this can be of anything, because it is the format chosen that will shape the drawing and give you a new image.


Start by making a flat gridded sheet of paper and on this plot a plan view of your chosen drawing. Then make a side view of it. If your drawing appears to you as flat, don’t worry, try and invent some high points and low points and then try and do this with a plan view as if cut through the centre and then on the furthest side away from you. These drawings in themselves may already be interesting.


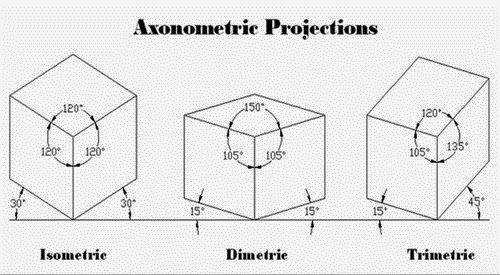
Use the information gathered to try and make four Axonometric projections, including isometric, diametric, trimetric and oblique. By making drawings of plan and elevations of your work you will have already developed some Orthographic projections.


Oblique projection

Once you have the idea of these four different ways of doing technical projections start to make a large drawing (at least 2xA1) that stretches your understanding of how an existing flat drawing can be pulled into an axonometric space. Try to think about atmospheric perspective and mark diversity as you build these drawings in order to keep your mark-making invention subtle and purposeful.


4. Finding the core


If you are having problems working from photographic imagery you could try this exercise. Cut 20 sheets of A5 good quality watercolour paper from existing A1 stock. Mix at least 6 grades of grey ink, going from very light to dark almost black. Keep each tonal grade separate. Select six watercolour brushes of different sizes.


Working from a selected images work quickly using the largest brush and the lightest ink on 10 sheets of your paper. Try and capture the essence of the image but do not get into detail. Do this again on the next 10 sheets this time working wet on wet. I.e. dampen your papers before using them.


By the time you have finished the last wet on wet image the first of your initial 10 images should be dry enough to work over.


Before doing this however look at all the drawings you have done and see if any are interesting in their present state, if so remove from the pile and keep for later.


This time select the next tonal value one step darker and repeat the process using a slightly smaller brush. Again work quickly, this time you have a faint image to guide you and this should help your positioning of mark and tone. Once all 20 are done, (wet on wet images might need re-dampening) again line them up and select out any interesting ones, then move on to the next darkest ink and next smallest brush. Keep doing this until you have used the darkest tone. Now put up an exhibition of all 20 images.


PS When I first did this we worked with 50 starting images, so if you are feeling ambitious up the numbers.


Look at the work of Marlene Dumas and June Glasson in particular her series The Foulest of Shapes. http://www.juneglasson.com/the-foulest-of-shapes/#1


On completion you will have a series of images of varying tonality and with a variety of mark qualities. Hopefully this series of images will allow you to start to develop a personal language with which to deal with photographs within a drawing context. One of the biggest issues with a photograph is what is often called the ‘tyranny of the image’. It is sometimes very hard to break through the ‘it looks like a photograph’ barrier. Once you have made these images, some of the worst ones could be re-cycled again, this time working on top of them with pen and ink.


Losing and finding


Take any of your existing images that are on paper, (in particular ones that you don’t think work or are poor) stretch them* and when dry, paint over them using slightly diluted emulsion or use white chalk on dry paper to do a similar thing. You should be able to see a ghost of your old image underneath. Now start picking out what you feel was most important about that image and re-draw using whatever materials interest you. (Ink and brush, pencils and oil pastel, charcoal and graphite etc.)


If you think of a drawing as the creation of a problem which is then solved, then what you are doing is discovering a problem starting with, “why is this drawing not good enough?” What remains is then the struggle to reveal what the drawing is becoming about as well as what it was about. This is a type of compacted time, the compacted image that results being about resurrection and re-establishment.


What you will gain from this is a process for rescuing drawings that might otherwise be discarded. It will also allow you to value mistakes and use them as a tool to enable you to make progress.


“Drawings reveal the process of their own making, their own looking” John Berger


*How to stretch paper


If you have never stretched paper before there are lots of useful videos on YouTube such as: http://www.youtube.com/watch?v=X_uedfZuvXo (Also read the comments below, as people have picked up common problems) My tips would be make sure you use good quality brown gum strip tape, (don’t try and use masking tape) and a large plywood board that has been thoroughly washed beforehand to make sure no binding glue is left in the top layers of the wood. I have also found it useful to only wet the gun-strip lightly as too much water means it slides away from the paper as it pulls tight.


To get a sense of why paper is like it is see: https://www.youtube.com/watch?v=idb-42TJl7U&feature=plcp


After looking at the basic languages of drawing you can try out the implications by designing your own drawing exercises. 

See: 

Is drawing a language?